Hänge Aufnahmen an deine Stücke und übe mit ihnen – mit A–B-Schleife, langsamerem Tempo, anderer Tonhöhe und automatischem Umblättern.
Audiospuren hinzufügen
Ein Stück kann mehrere Audiospuren haben, z. B. eine Originalaufnahme, ein Playback und eine langsame Übe-Version. Unterstützte Formate: MP3, M4A, AAC, WAV und FLAC. Ogg und Opus werden nicht unterstützt.
So fügst du eine Spur hinzu – auf einem der beiden Wege:
In der Bibliothek: Öffne das Menü eines Stücks und wähle Audio hinzufügen. Wähle dann die Audiodatei.
Im Viewer: Öffne Werkzeuge › Audio-Player und tippe auf Audio hinzufügen. Hat das Stück schon Spuren, findest du den Knopf im ausgeklappten Player (Mehr Bedienelemente).
Die Datei wird ins Stück kopiert und wird mit ihm gesichert und abgeglichen. Der Name der Spur ergibt sich aus dem Dateinamen.
Im ausgeklappten Player siehst du unten alle Spuren. Tippe auf eine Spur, um sie auszuwählen. Mit Löschen (Papierkorb) entfernst du eine Spur samt Datei – nach einer Rückfrage Audiospur entfernen?.
Plattform-Hinweise:
Windows: M4A und AAC brauchen die Medienfunktionen von Windows. In „N“-Editionen ohne Media Feature Pack fehlen sie.
Alle Plattformen: Eine Spur wird zum Abspielen komplett in den Arbeitsspeicher geladen (etwa 10 MB pro Minute). Sehr lange Aufnahmen brauchen also viel Speicher.
Im Browser und auf dem iPad startet der Ton erst nach einem Tipp – das ist eine Vorgabe der Browser.
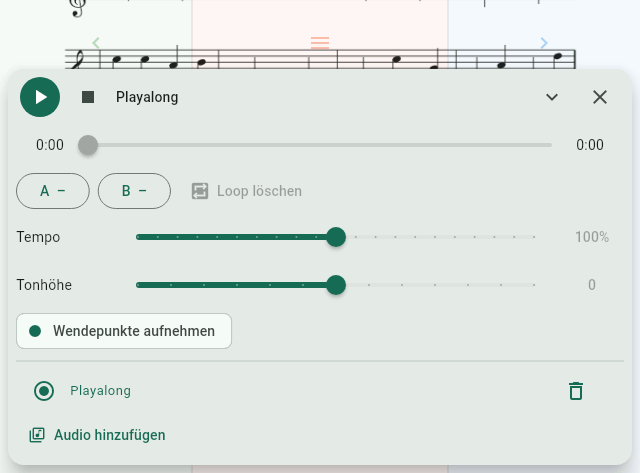
Der Player
Wiedergabe, A–B-Schleife, Tempo, Tonhöhe und Wendepunkte
Öffne den Player im Viewer über Werkzeuge › Audio-Player (Bedienleiste: in die Mitte der Seite tippen).
Zuerst erscheint eine kompakte Leiste über den Noten:
Abspielen / Pause und Stopp.
Den Namen der ausgewählten Spur.
Eine Zeitleiste zum Springen; Markierungen zeigen Schleife und Wendepunkte.
Mehr Bedienelemente: klappt den großen Player auf (Schleife, Tempo, Tonhöhe, Wendepunkte, Spurliste). Weniger Bedienelemente klappt ihn wieder zu.
Schließen.
Du kannst den Player auch per Pedal, Taste, Tipp-Zone oder MIDI steuern: Lege dafür die Aktion Audio abspielen/pausieren fest (siehe Pedal-Aktionen).
Schleife, Tempo und Tonhöhe
Im ausgeklappten Player:
Schleife (A–B): Tippe während der Wiedergabe am Anfang der Stelle auf A und am Ende auf B. Die Stelle wiederholt sich nun, bis du Loop löschen wählst.
Tempo: von 50 % bis 150 %, ohne dass sich die Tonhöhe ändert. Ein Tipp auf den Prozentwert rechts setzt auf 100 % zurück.
Tonhöhe: ±6 Halbtöne, ohne dass sich das Tempo ändert – z. B. um ein Playback in deine Tonart zu bringen. Ein Tipp auf den Wert rechts setzt auf 0 zurück.
Schleife, Tempo und Tonhöhe werden pro Spur gespeichert und sind beim nächsten Öffnen wieder da.
Wendepunkte: automatisch umblättern
Notenpult kann sich merken, an welcher Stelle der Aufnahme du umblätterst – und das beim nächsten Mal von selbst tun.
So nimmst du Wendepunkte auf:
Öffne den Player und klappe ihn mit Mehr Bedienelemente auf.
Gehe zur ersten Seite des Stücks.
Tippe auf Wendepunkte aufnehmen. Die Wiedergabe startet.
Blättere während der Wiedergabe ganz normal um – mit Pedal, Tippen oder Wischen. Jede Wendung wird mit ihrer Position gespeichert. Blätterst du zurück, wird die letzte Wendung wieder verworfen.
Tippe erneut auf Wendepunkte aufnehmen, um die Aufnahme zu beenden und zu speichern.
Beim nächsten Abspielen blättert Notenpult an den aufgenommenen Stellen um. Springst du in der Zeitleiste oder läuft eine Schleife, zeigt Notenpult automatisch die passende Seite. Mit … Wendepunkte löschen entfernst du alle Wendepunkte der Spur.
Einstellungen dazu unter Einstellungen › Audio & Metronom:
An aufgenommenen Wendepunkten umblättern (standardmäßig an): schaltet das automatische Umblättern ein oder aus.
Kein Stückwechsel während Audio läuft: Während der Wiedergabe sind Weiterblättern über die letzte Seite hinaus sowie Nächstes Stück und Vorheriges Stück gesperrt. So springst du in einer Setliste nicht versehentlich ins nächste Lied, während das Playback noch läuft.
Attach recordings to your scores and practise with them – with an A–B loop, slower tempo, different pitch and automatic page turns.
Adding audio tracks
A score can have several audio tracks, e.g. an original recording, a backing track and a slow practice version. Supported formats: MP3, M4A, AAC, WAV and FLAC. Ogg and Opus are not supported.
Add a track in one of two ways:
In the library: open the menu of a score and choose Add audio. Then pick the audio file.
In the viewer: open Tools › Audio player and tap Add audio. If the score already has tracks, you find the button in the expanded player (More controls).
The file is copied into the score and is backed up and synchronised with it. The track name comes from the file name.
In the expanded player you see all tracks at the bottom. Tap a track to select it. Delete (bin) removes a track together with its file – after the question Remove audio track?.
Platform notes:
Windows: M4A and AAC need the Windows media features. They are missing in "N" editions without the Media Feature Pack.
All platforms: a track is loaded completely into memory for playback (about 10 MB per minute). Very long recordings therefore need a lot of memory.
In the browser and on the iPad, sound only starts after a tap – browsers require this.
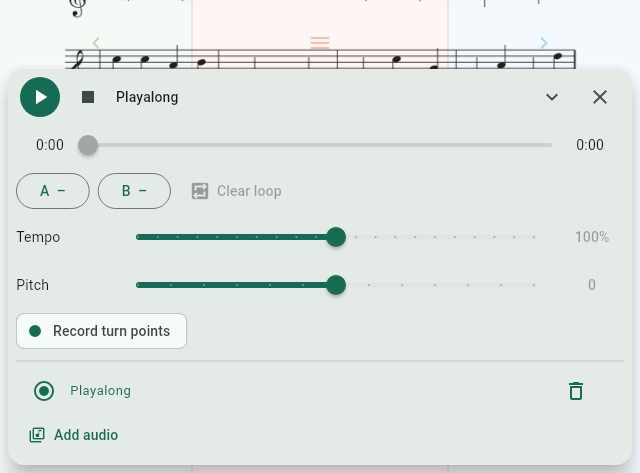
The player
Playback, A–B loop, tempo, pitch and turn points
Open the player in the viewer via Tools › Audio player (control bar: tap the middle of the page).
First a compact bar appears above the music:
Play / Pause and Stop.
The name of the selected track.
A timeline for jumping; markers show the loop and the turn points.
More controls: expands the large player (loop, tempo, pitch, turn points, track list). Fewer controls collapses it again.
Close.
You can also control the player with a pedal, key, tap zone or MIDI: assign the action Audio play/pause (see pedal actions).
Loop, tempo and pitch
In the expanded player:
Loop (A–B): during playback, tap A at the start of the passage and B at its end. The passage now repeats until you choose Clear loop.
Tempo: from 50 % to 150 % without changing the pitch. Tapping the percentage on the right resets it to 100 %.
Pitch: ±6 semitones without changing the tempo – e.g. to bring a backing track into your key. Tapping the value on the right resets it to 0.
Loop, tempo and pitch are saved per track and are back the next time you open the score.
Turn points: automatic page turns
Notenpult can remember where in the recording you turn the page – and do it by itself next time.
To record turn points:
Open the player and expand it with More controls.
Go to the first page of the score.
Tap Record turn points. Playback starts.
Turn the pages as usual while it plays – with a pedal, a tap or a swipe. Every turn is stored with its position. If you turn back, the last turn is discarded again.
Tap Record turn points again to end the recording and save it.
The next time you play the track, Notenpult turns the pages at the recorded spots. If you jump in the timeline or a loop runs, Notenpult shows the matching page automatically. Delete … turn points removes all turn points of the track.
Related settings under Settings › Audio & metronome:
Turn pages at recorded turn points (on by default): switches the automatic page turns on or off.
No score change while audio plays: during playback, turning past the last page as well as Next score and Previous score are blocked. So in a setlist you cannot jump into the next song by accident while the backing track is still playing.